On this page
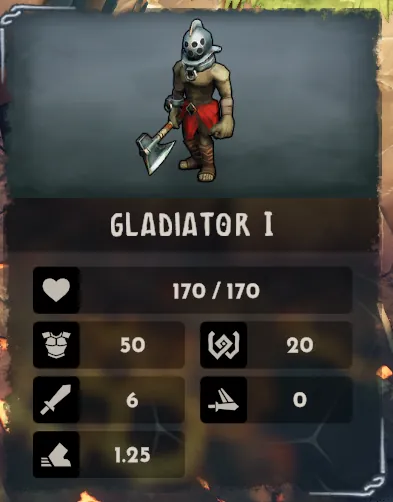
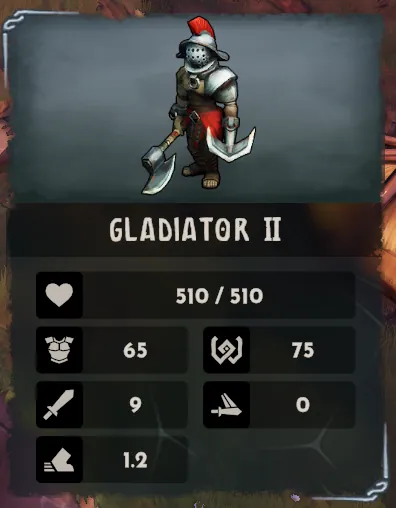
An axe carrier with a metal face helmet and red waistcloth. Rank II wears a red-plumed helmet and carries a two-handed weapon. These cards were captured by the site owner in our demo run (v0.19.4e).
Captured readings
| Rank | Health | Chest-armour | Shield-with-swirl | Sword | Winged-sword | Split-shield/% | Boot |
|---|---|---|---|---|---|---|---|
| I | 170/170 | 50 | 20 | 6 | 0 | — | 1.25 |
| I | 170/170 | 50 | 14 | 6 | 0 | — | 1.25 |
| I | 48/170 | 50 | 0 | 6 | 0 | — | 1.25 |
| I | 320/320 | 15 | 35 | 8 | 1.5 | — | 1.3 |
| II | 510/510 | 65 | 75 | 9 | 0 | — | 1.2 |
The 170/170 cards show the same base readings with shield-with-swirl values of 20 and 14; the damaged 48/170 card shows 0. This is consistent with that value depleting before Health, but the icon meaning remains unconfirmed. These are damage states of the 170 maximum-Health version, alongside a separate 320 maximum-Health version. Gladiator III was not captured.
Reading the icons
- Heart = Health (current / max).
- Chest-armour icon = appears to be Armor (unconfirmed).
- Shield-with-swirl icon = appears to be Ward (unconfirmed).
- Sword = appears to be attack damage (unconfirmed).
- Winged-sword icon = meaning unknown.
- Split-shield/% icon = meaning unknown (percentage).
- Boot = appears to be movement speed (unconfirmed).
The table uses icon names rather than treating these readings as confirmed mechanics. A dash means the card has no such field.
Why do cards differ?
Gladiator I has several captured readings; the reason for the differences is unconfirmed. Possible explanations include later waves, the Corrupted Shrine, Elite variants, island garrisons versus trench waves, or player debuffs such as Tarbarl Armor Shred. These are unverified explanations; the cropped cards do not show wave or location. No Elite marker was seen.
Options that target this
- Armor Pierce: Boltskot PIERCING TIPS and the Hero in-run PIERCING STRIKES I (“Hero: +75% Ward Break, +25% Armor Pierce”).
- Armor Shred: Tarbarl CAUSTIC SOLUTIONS and REVERED CONCOCTIONS.
- Ward Break: Skullbrakkr ENGRAVED STONES, Spearman ANTIMAGIC TIPS and the Hero in-run PIERCING STRIKES I (“Hero: +75% Ward Break, +25% Armor Pierce”).
- Marks: Eyodin PRIMORDIAL GLARE and PIERCING GAZE refer to Mark Damage Multiplier.
These are captured in-game options, not tested best counters. See Health, Armor and Ward before interpreting the icons.
Related
Source links sit beside the claims they support. These guides distinguish official information from editorial advice. Read our editorial policy.